一:
1 什么是webservice
1.1 什么是远程调用技术
远程调用数据定义:是系统和系统之间的调用
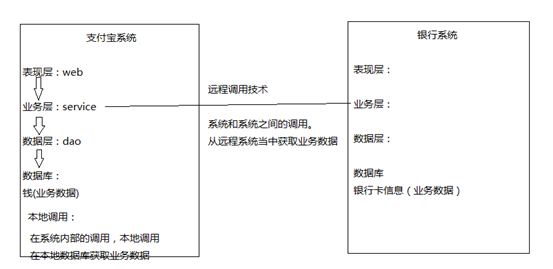
Webservice是使用Http发送SOAP协议的数据的一种远程调用技术
Webservice要开发服务端
Webservice要开发客户端
Webservice客户端开发需要阅读服务端的使用说明书(WSDL)
Webservice的优缺点
优点:
l 发送方式采用http的post发送,http的默认端口是80,防火墙默认不拦截80,所以跨防火墙
l 采用XML格式封装数据,XML是跨平台的,所以webservice也可以跨平台。
l Webservice支持面向对象
缺点:
l 采用XML格式封装数据,所以在传输过程中,要传输额外的标签,随着SOAP协议的不断完善,标签越来越大,导致webservice性能下降
二:入门程序
需求
l 服务端:发布一个天气查询服务,接收客户端城市名,返回天气数据给客户端
l 客户端:发送城市名称给服务端,接收服务端的返回天气数据,打印
实现
服务端:
开发步骤:
l 第一步:创建SEI(Service Endpoint Interface)接口,本质上就是Java接口
public interface WeatherInterface {

    public String queryWeather(String cityName);

}
第二步:创建SEI实现类,在实现类上加入@WebService
@WebService//@WebService表示该类是一个服务类,需要发布其中的public的方法
public class WeatherInterfaceImpl implements WeatherInterface {

    @Override
    public String queryWeather(String cityName) {
        System.out.println("from client..."+cityName);
        String weather = "晴";
        return weather;
    }
}
l 第三步:发布服务,Endpoint发布服务,publish方法,两个参数:1.服务地址;2.服务实现类
public class WeatherServer {

    public static void main(String[] args) {
        //Endpoint发布服务
        //参数解释
        //1.address - 服务地址
        //2.implementor - 实现类
        Endpoint.publish("http://127.0.0.1:12345/weather", new WeatherInterfaceImpl());
    }
}
l 第四步:测试服务是否发布成功,通过阅读使用说明书,确定客户端调用的接口、方法、参数和返回值存在,证明服务发布成功。
WSDL地址:服务地址+”?wsdl”
WSDL阅读方式:从下往上


客户端:
开发步骤
l 第一步:wsimport命令生成客户端代码
wsimport -s . http://127.0.0.1:12345/weather?wsdl
l 第二步:根据使用说明书,使用客户端代码调用服务端
Ø 第一步:创建服务视图,视图是从service标签的name属性获取
Ø 第二步:获取服务实现类,实现类从portType的name属性获取
Ø 第三步:获取查询方法,从portType的operation标签获取
public class WeatherClient {

    public static void main(String[] args) {
        //创建服务视图
        WeatherInterfaceImplService weatherInterfaceImplService = new WeatherInterfaceImplService();
        //获取服务实现类
        WeatherInterfaceImpl weatherInterfaceImpl = weatherInterfaceImplService.getPort(WeatherInterfaceImpl.class);
        //调用查询方法,打印
        String weather = weatherInterfaceImpl.queryWeather("北京");

        System.out.println(weather);
    }
}
三:WSDL
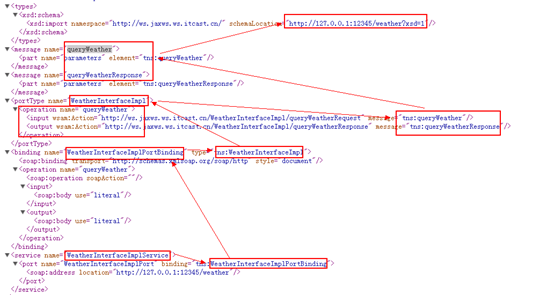
WSDL及web服务描述语言,他是webservice服务端使用说明书,说明服务端接口、方法、参数和返回值,WSDL是随服务发布成功,自动生成,无需编写
文档结构:

l
l
l
l
l
阅读从下往上:
四:SOAP
l SOAP即简单对象访问协议,他是使用http发送的XML格式的数据,它可以跨平台,跨防火墙,SOAP不是webservice的专有协议。
l SOAP=http+xml
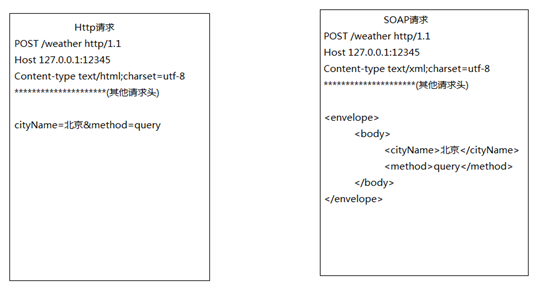
l 必需有 Envelope 元素,此元素将整个 XML 文档标识为一条 SOAP 消息
l 可选的 Header 元素,包含头部信息
l 必需有Body 元素,包含所有的调用和响应信息
l 可选的 Fault 元素,提供有关在处理此消息所发生错误的信息
五:REST
五:CXF
1:简介
CXF是什么?有什么用?优点
Apache CXF 是一个开源的web Services 框架,CXF 帮助您构建和开发 web Services ,它支持多种协议,支持数据格式:XML,JSON(仅在REST方式下支持)
2:CXF的基础知识
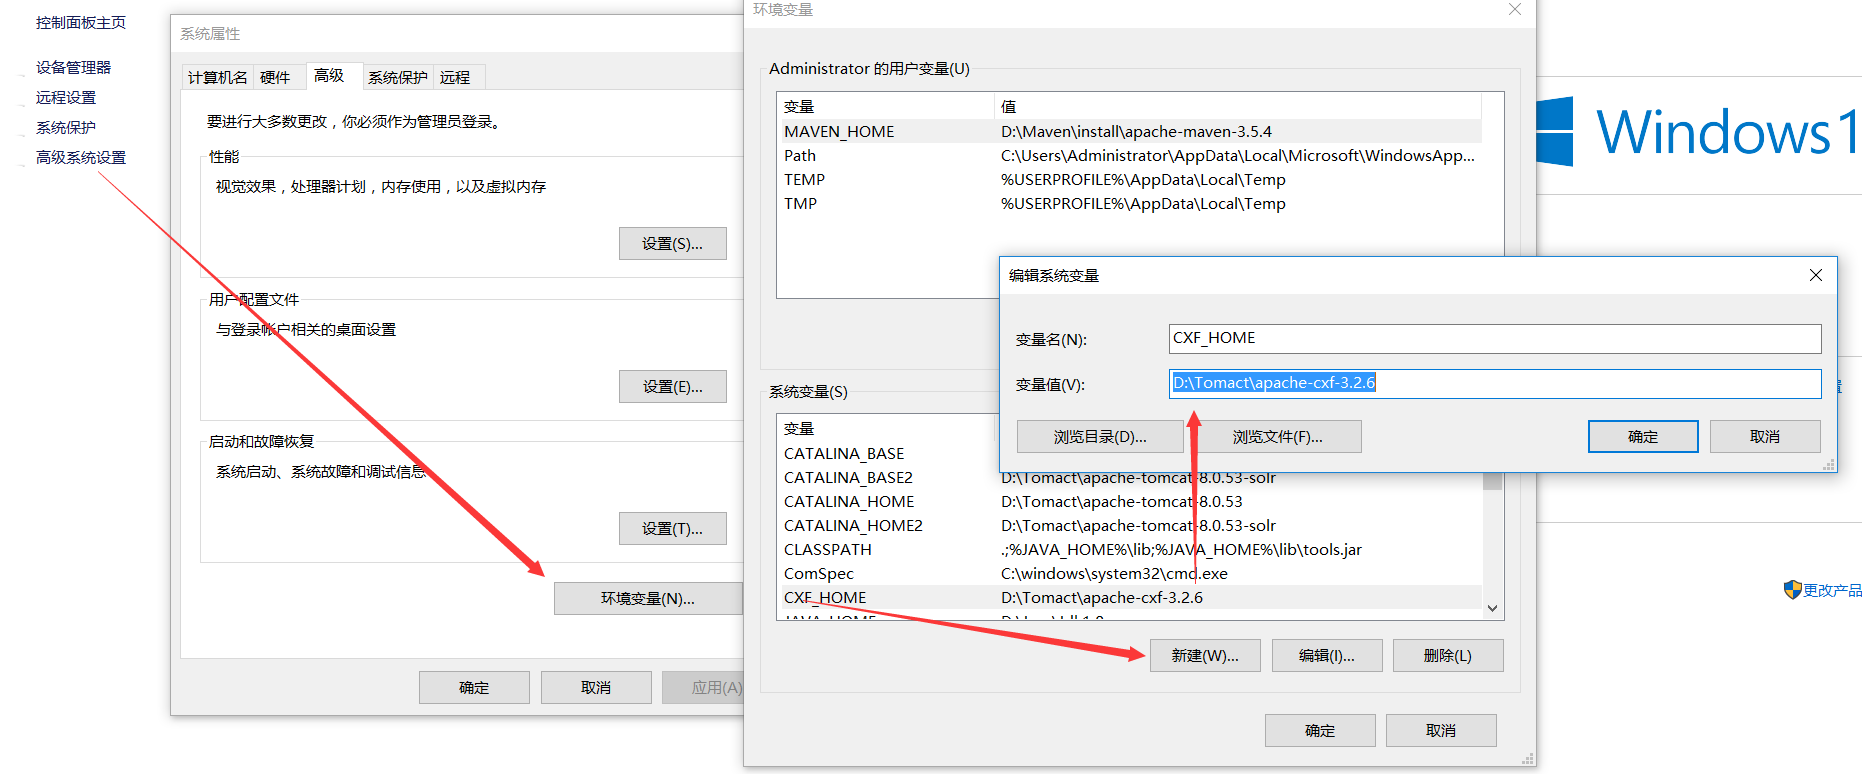
2.1:安装配置
官网下载,解压
环境变量配置
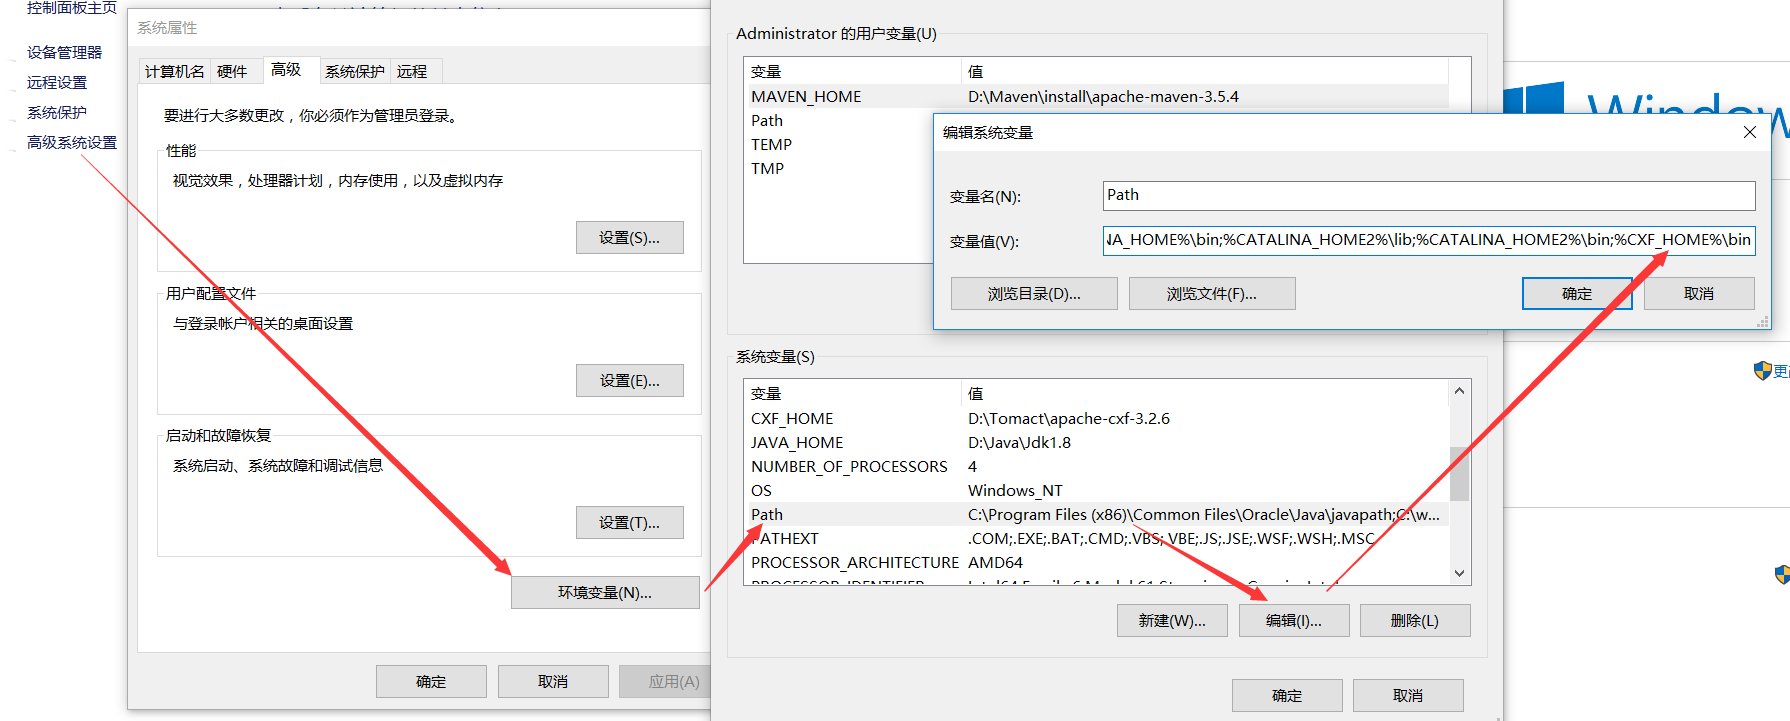
3:CXF与Spring整合发布SAOP与REST项目
3.1 CXF+Spring整合发布SAOP协议服务
3.1.1服务端
开发步骤:
第一步:创建web项目,导入jar包,maven项目添加坐标
maven需三个:cxf-core, cxf-rt-frontend-jaxws,cxf-rt-transports-http-jetty
第二步:创建SEI接口(SEI在webservice中称为portType,在java中称为接口)
 1 import javax.jws.WebService;
 2 import javax.xml.ws.BindingType;
 3 import javax.xml.ws.soap.SOAPBinding;
 4
 5 /**
 6  *
 7  * <p>Title: WeatherInterface.java</p>
 8  * <p>Description:SEI接口</p>
 9  */
10 @WebService
11 @BindingType(SOAPBinding.SOAP12HTTP_BINDING)
12 public interface WeatherInterface {
13
14     public String queryWeather(String cityName);
15
16 }
第三步:创建SEI实现类
 1 public class WeatherInterfaceImpl implements WeatherInterface {
 2
 3     @Override
 4     public String queryWeather(String cityName) {
 5         System.out.println("from client..."+cityName);
 6         if("北京".equals(cityName)){
 7             return "冷且霾";
 8         } else {
 9             return "暖且晴";
10         }
11     }
12
13 }
第四步:配置Spring配置文件beans.xml
用<jaxws:server标签发布服务,设置 1.服务地址; 2.设置服务接口; 3设置服务实现类
 1 <?xml version="1.0" encoding="UTF-8"?>
 2 <beans xmlns="http://www.springframework.org/schema/beans"
 3     xmlns:xsi="http://www.w3.org/2001/XMLSchema-instance" xmlns:jaxws="http://cxf.apache.org/jaxws"
 4     xmlns:jaxrs="http://cxf.apache.org/jaxrs" xmlns:cxf="http://cxf.apache.org/core"
 5     xsi:schemaLocation="http://www.springframework.org/schema/beans
 6                             http://www.springframework.org/schema/beans/spring-beans.xsd
 7                             http://cxf.apache.org/jaxrs http://cxf.apache.org/schemas/jaxrs.xsd
 8                             http://cxf.apache.org/jaxws http://cxf.apache.org/schemas/jaxws.xsd
 9                             http://cxf.apache.org/core http://cxf.apache.org/schemas/core.xsd">
10     <!-- <jaxws:endpoint发布SOAP协议的服务 ,对Endpoint类封装-->
11     <jaxws:endpoint address="/hello" implementor="com.xqc.ws.cxf.server.HelloWorld"/>
12
13     <!-- <jaxws:server发布SOAP协议的服务 ,对JaxWsServerFactoryBean类封装-->
14     <jaxws:server address="/weather" serviceClass="com.xqc.ws.cxf.server.WeatherInterface">
15         <jaxws:serviceBean>
16             <ref bean="weatherInterface"/>
17         </jaxws:serviceBean>
18
19         <!-- 配置拦截器 -->
20         <jaxws:inInterceptors>
21             <ref bean="inIntercepter"/>
22         </jaxws:inInterceptors>
23         <jaxws:outInterceptors>
24             <ref bean="outIntercepter"/>
25         </jaxws:outInterceptors>
26     </jaxws:server>
27     <!-- 配置拦截器的bean -->
28     <bean name="inIntercepter" class="org.apache.cxf.interceptor.LoggingInInterceptor"/>
29     <bean name="outIntercepter" class="org.apache.cxf.interceptor.LoggingOutInterceptor"/>
30
31     <!-- 配置服务实现类 -->
32     <bean name="weatherInterface" class="com.xqc.ws.cxf.server.WeatherInterfaceImpl"/>
33 </beans>
第五步:配置Web.xml
 1 <?xml version="1.0" encoding="UTF-8"?>
 2 <web-app xmlns:xsi="http://www.w3.org/2001/XMLSchema-instance" xmlns="http://java.sun.com/xml/ns/javaee" xsi:schemaLocation="http://java.sun.com/xml/ns/javaee http://java.sun.com/xml/ns/javaee/web-app_3_0.xsd" id="WebApp_ID" version="3.0">
 3   <display-name>ws_2_cxf_spring_server</display-name>
 4
 5   <!-- 设置spring的环境 ,加载spring配置文件 -->
 6   <context-param>
 7       <!--contextConfigLocation是不能修改的  -->
 8       <param-name>contextConfigLocation</param-name>
 9       <param-value>classpath:beans.xml</param-value>
10   </context-param>
11   <listener>
12       <listener-class>org.springframework.web.context.ContextLoaderListener</listener-class>
13   </listener>
14
15   <!-- 配置CXF的Servlet -->
16   <servlet>
17       <servlet-name>CXF</servlet-name>
18       <servlet-class>org.apache.cxf.transport.servlet.CXFServlet</servlet-class>
19   </servlet>
20   <servlet-mapping>
21       <servlet-name>CXF</servlet-name>
22       <url-pattern>/ws/*</url-pattern>
23   </servlet-mapping>
24
25   <welcome-file-list>
26     <welcome-file>index.html</welcome-file>
27     <welcome-file>index.htm</welcome-file>
28     <welcome-file>index.jsp</welcome-file>
29     <welcome-file>default.html</welcome-file>
30     <welcome-file>default.htm</welcome-file>
31     <welcome-file>default.jsp</welcome-file>
32   </welcome-file-list>
33 </web-app>
第六步:部署到tomact下,启动tomact
第七步:测试服务
浏览器输入:WSDL地址规则:http://ip:端口号/项目名称/servlet拦截路径/服务名称?wsdl
第八步:Endpoint标签发布服务
添加文件
1 @WebService
2 public class HelloWorld {
3     public String sayHello(String name){
4         return "hello,"+name;
5     }
6
7 }
在beans中添加配置
1      <!-- <jaxws:endpoint发布SOAP协议的服务 ,对Endpoint类封装-->
2      <jaxws:endpoint address="/hello" implementor="com.xqc.ws.cxf.server.HelloWorld"/>
访问:http://ip:端口号/项目名称/servlet拦截路径/ 例如:http://localhost:8080/ws_2_cxf_spring_server/ws/
3.1.2 客户端(近写一个javase的客户端演示一下,客户端可以很多)
开发步骤:
第一步:引入jar包
第二步:生成客户端代码
第三步:配置spring配置文件,applicationContent.xml
<?xml version="1.0" encoding="UTF-8"?>
<beans xmlns="http://www.springframework.org/schema/beans"
    xmlns:xsi="http://www.w3.org/2001/XMLSchema-instance" xmlns:jaxws="http://cxf.apache.org/jaxws"
    xmlns:jaxrs="http://cxf.apache.org/jaxrs" xmlns:cxf="http://cxf.apache.org/core"
    xsi:schemaLocation="http://www.springframework.org/schema/beans
                            http://www.springframework.org/schema/beans/spring-beans.xsd
                            http://cxf.apache.org/jaxrs http://cxf.apache.org/schemas/jaxrs.xsd
                            http://cxf.apache.org/jaxws http://cxf.apache.org/schemas/jaxws.xsd
                            http://cxf.apache.org/core http://cxf.apache.org/schemas/core.xsd">
    <!-- <jaxws:client实现客户端 ,对JaxWsProxyFactoryBean类封装-->
    <jaxws:client id="weatherClient" address="http://127.0.0.1:8080/ws_2_cxf_spring_server/ws/weather" serviceClass="com.xqc.cxf.weather.WeatherInterface"/>
</beans>
第四步:从spring上下文件获取服务实现类
第五步:调用查询方法,打印
 1 package com.xqc.cxf.client;
 2
 3 import org.springframework.context.ApplicationContext;
 4 import org.springframework.context.support.ClassPathXmlApplicationContext;
 5
 6 import com.xqc.cxf.weather.WeatherInterface;
 7
 8 public class WeatherClient {
 9
10     public static void main(String[] args) {
11         //初始化spring的上下文
12         ApplicationContext context = new ClassPathXmlApplicationContext("classpath:beans.xml");
13         WeatherInterface  weatherInterface = (WeatherInterface) context.getBean("weatherClient");
14         String weather = weatherInterface.queryWeather("保定");
15         System.out.println(weather);
16     }
17 }
3.2CXF+Spring整合发布REST服务
3.2.1服务端
开发步骤:
第一步:导入jar包
第二步:创建学生pojo类,要加入@ XmlRootElement
 1 package com.xqc.ws.rest.pojo;
 2
 3 import java.util.Date;
 4
 5 import javax.xml.bind.annotation.XmlRootElement;
 6
 7 /**
 8  *
 9  * <p>Title: Student.java</p>
10  * <p>Description:学生实体类</p>
11  */
12 @XmlRootElement(name="student")//@XmlRootElement可以实现对象和XML数据之间的转换
13 public class Student {
14
15     private long id;
16
17     private String name;
18
19     private Date birthday;
20
21     public long getId() {
22         return id;
23     }
24
25     public void setId(long id) {
26         this.id = id;
27     }
28
29     public String getName() {
30         return name;
31     }
32
33     public void setName(String name) {
34         this.name = name;
35     }
36
37     public Date getBirthday() {
38         return birthday;
39     }
40
41     public void setBirthday(Date birthday) {
42         this.birthday = birthday;
43     }
44
45 }
第三步:创建SEI接口
 1 package com.xqc.ws.rest.server;
 2
 3 import java.util.List;
 4 import javax.jws.WebService;
 5 import javax.ws.rs.GET;
 6 import javax.ws.rs.Path;
 7 import javax.ws.rs.PathParam;
 8 import javax.ws.rs.Produces;
 9 import javax.ws.rs.core.MediaType;
10
11 import com.xqc.ws.rest.pojo.Student;
12
13 /**
14  *
15  * <p>Title: StudentInterface.java</p>
16  * <p>Description:学生接口</p>
17  */
18 @WebService
19 @Path("/student")//@Path("/student")就是将请求路径中的“/student”映射到接口上
20 public interface StudentInterface {
21
22     //查询单个学生
23     @GET//指定请求方式,如果服务端发布的时候指定的是GET(POST),那么客户端访问时必须使用GET(POST)
24     @Produces(MediaType.APPLICATION_XML)//指定服务数据类型
25     @Path("/query/{id}")//@Path("/query/{id}")就是将“/query”映射到方法上,“{id}”映射到参数上,多个参数,以“/”隔开,放到“{}”中
26     public Student query(@PathParam("id")long id);
27
28     //查询多个学生
29     @GET//指定请求方式,如果服务端发布的时候指定的是GET(POST),那么客户端访问时必须使用GET(POST)
30     @Produces("application/json;charset=utf-8")//指定服务数据类型
31     @Path("/queryList/{name}")//@Path("/queryList/{name}")就是将“/queryList”映射到方法上,“{name}”映射到参数上,多个参数,以“/”隔开,放到“{}”中
32     public List<Student> queryList(@PathParam("name")String name);
33
34 }
第四步:创建SEI实现类
 1 package com.xqc.ws.rest.server;
 2
 3 import java.util.ArrayList;
 4 import java.util.Date;
 5 import java.util.List;
 6
 7 import com.xqc.ws.rest.pojo.Student;
 8
 9 /**
10  *
11  * <p>Title: StudentInterfaceImpl.java</p>
12  * <p>Description:学生的实现类</p>
13  */
14 public class StudentInterfaceImpl implements StudentInterface {
15
16     @Override
17     public Student query(long id) {
18         Student st = new Student();
19         st.setId(110);
20         st.setName("张三");
21         st.setBirthday(new Date());
22         return st;
23     }
24
25     @Override
26     public List<Student> queryList(String name) {
27
28         Student st = new Student();
29         st.setId(110);
30         st.setName("张三");
31         st.setBirthday(new Date());
32
33         Student st2 = new Student();
34         st2.setId(120);
35         st2.setName("李四");
36         st2.setBirthday(new Date());
37
38         List<Student> list = new ArrayList<Student>();
39         list.add(st);
40         list.add(st2);
41         return list;
42     }
43
44 }
第五步:
配置Spring配置文件,beans.xml,<jaxrs:server,设置1.服务地址;2.服务实现类
 1 <?xml version="1.0" encoding="UTF-8"?>
 2 <beans xmlns="http://www.springframework.org/schema/beans"
 3     xmlns:xsi="http://www.w3.org/2001/XMLSchema-instance" xmlns:jaxws="http://cxf.apache.org/jaxws"
 4     xmlns:jaxrs="http://cxf.apache.org/jaxrs" xmlns:cxf="http://cxf.apache.org/core"
 5     xsi:schemaLocation="http://www.springframework.org/schema/beans
 6                             http://www.springframework.org/schema/beans/spring-beans.xsd
 7                             http://cxf.apache.org/jaxrs http://cxf.apache.org/schemas/jaxrs.xsd
 8                             http://cxf.apache.org/jaxws http://cxf.apache.org/schemas/jaxws.xsd
 9                             http://cxf.apache.org/core http://cxf.apache.org/schemas/core.xsd">
10     <!-- <jaxrs:server发布REST的服务 ,对JAXRSServerFactoryBean类封装-->
11     <jaxrs:server address="/user">
12         <jaxrs:serviceBeans>
13             <ref bean="studentInterface"/>
14         </jaxrs:serviceBeans>
15     </jaxrs:server>
16
17     <!-- 配置服务实现类 -->
18     <bean name="studentInterface" class="com.xqc.ws.rest.server.StudentInterfaceImpl"/>
19 </beans>
第六步:配置web.xml
<?xml version="1.0" encoding="UTF-8"?>
<web-app xmlns:xsi="http://www.w3.org/2001/XMLSchema-instance" xmlns="http://java.sun.com/xml/ns/javaee" xsi:schemaLocation="http://java.sun.com/xml/ns/javaee http://java.sun.com/xml/ns/javaee/web-app_3_0.xsd" id="WebApp_ID" version="3.0">
  <display-name>ws_2_cxf_spring_server</display-name>

  <!-- 设置spring的环境 -->
  <context-param>
      <!--contextConfigLocation是不能修改的  -->
      <param-name>contextConfigLocation</param-name>
      <param-value>classpath:applicationContext.xml</param-value>
  </context-param>
  <listener>
      <listener-class>org.springframework.web.context.ContextLoaderListener</listener-class>
  </listener>

  <!-- 配置CXF的Servlet -->
  <servlet>
      <servlet-name>CXF</servlet-name>
      <servlet-class>org.apache.cxf.transport.servlet.CXFServlet</servlet-class>
  </servlet>
  <servlet-mapping>
      <servlet-name>CXF</servlet-name>
      <url-pattern>/ws/*</url-pattern>
  </servlet-mapping>

  <welcome-file-list>
    <welcome-file>index.html</welcome-file>
    <welcome-file>index.htm</welcome-file>
    <welcome-file>index.jsp</welcome-file>
    <welcome-file>default.html</welcome-file>
    <welcome-file>default.htm</welcome-file>
    <welcome-file>default.jsp</welcome-file>
  </welcome-file-list>
</web-app>
第七步:部署到tomcat下,启动tomcat
第八步:测试服务
REST服务的使用说明书地址:
http://127.0.0.1:8080/ws_4_cxf_rest_spring_server/ws/user?_wadl
http://127.0.0.1:8080/ws_4_cxf_rest_spring_server/ws/user/student/query/110 查询单个学生,返回XML数据
1 <student>
2 <birthday>2015-11-27T15:22:14.240+08:00</birthday>
3 <id>110</id>
4 <name>张三</name>
5 </student>
http://127.0.0.1:8080/ws_4_cxf_rest_spring_server/ws/user//student/queryList/110?_type=json 查询多个学生,返回JSON
{"student":[{"birthday":"2015-11-27T15:24:21.565+08:00","id":110,"name":"张三"},{"birthday":"2015-11-27T15:24:21.565+08:00","id":120,"name":"李四"}]}
3.2.2:客户端:因为返回的直接就是数据,其实直接解析就可以,DOM4J解析
直接用新建html然后使用Ajax使用即可