Ehcache技术详解
一:基本概念
EHCache是一个快速的、轻量级的、易于使用的、进程内的缓存。它支持read-only和read/write缓存,内存和磁盘缓存。是一个非常轻量级的缓存实现,而且从1.2 之后就支持了集群,目前的最新版本是2.8。
1:主要特性
快速、简单
提供LRU、LFU和FIFO 缓存策略
缓存数据有两级:内存和磁盘,因此无需担心容量问题
缓存数据会在虚拟机重启的过程中写入磁盘
支持分布式缓存
支持多缓存管理器实例,以及一个实例的多个缓存区域
二:部署
引入
添加maven依赖
\
\
\
\
\</dependency>
配置
ehcache.xml中的内容如下:
\<?xml version="1.0" encoding="UTF-8"?>
\
\<!--
磁盘存储:将缓存中暂时不使用的对象,转移到硬盘,类似于Windows系统的虚拟内存
path:指定在硬盘上存储对象的路径
-->
\
\<!--
defaultCache:默认的缓存配置信息,如果不加特殊说明,则所有对象按照此配置项处理
maxElementsInMemory:设置了缓存的上限,最多存储多少个记录对象
eternal:代表对象是否永不过期
overflowToDisk:当内存中Element数量达到maxElementsInMemory时,Ehcache将会Element写到磁盘中
-->
\<defaultCache
maxElementsInMemory="100"
eternal="true"
overflowToDisk="true"/>
\<cache name="sampleCache1"
maxEntriesLocalHeap="10000"
maxEntriesLocalDisk="1000"
eternal="false"
overflowToDisk="true"
diskPersistent="true"
diskSpoolBufferSizeMB="20"
timeToIdleSeconds="300"
timeToLiveSeconds="600"
memoryStoreEvictionPolicy="LFU"
diskExpiryThreadIntervalSeconds ="120"
transactionalMode="off">
\<cacheEventListenerFactory
class="com.ehcache.EhcacheListenerTest"
properties="wxwtestkey=200,wxtestkey2=300"/>
\
\</cache>
\</ehcache>
配置项详解:
\
此配置项配置的是,磁盘缓存的位置。其中java.io.tmpdir的具体位置可以由java代码,System.getProperty("java.io.tmpdir") 来查看。此处的path也可以配置成 user.home,user.dir或用户设定的系统变量指定的路径。
Cache 元素表示一个一个缓存区域,在ehcache.xml中可以有多个cache,他们之间由name属性来区分。
maxEntriesLocalHeap="10000":表示内存中最大可以存在10000个元素。
maxEntriesLocalDisk="1000":表示磁盘中最大可以存在1000个元素
eternal="false":表示缓存是否持久,false表示不持久可被销毁,true表示一直存在。
overflowToDisk="true":是否保存到磁盘,当内存中的元素溢出时。
diskPersistent="true":是否保存到磁盘,当进程重启时。
diskSpoolBufferSizeMB="20":保存到磁盘的后台线程的缓存为20M,当数据从内存中转到磁盘时,会先将数据转入此缓存,然后由后台线程将数据从缓存中持久化到磁盘。
timeToIdleSeconds="300":表示缓存空闲300s后被销毁。
timeToLiveSeconds="600":表示缓存最长可以存在300s,然后被销毁。
memoryStoreEvictionPolicy="LFU":Ehcache的三种清空策略,FIFO:先进先出。LFU:一直以来最少被使用的,即缓存的元素有一个hit属性,hit值最小的将会被清出缓存。LRU:最近最少使用的,缓存的元素有一个时间戳,当缓存容量满了,而又需要腾出地方来缓存新的元素的时候,那么现有缓存元素中时间戳离当前时间最远的元素将被清出缓存。
diskExpiryThreadIntervalSeconds ="120":检查磁盘上的缓存超期的线程的运行周期为120s。
transactionalMode="off":事务关闭(ehcache中的事务是怎么使用的?)
三:使用
1:类层次结构
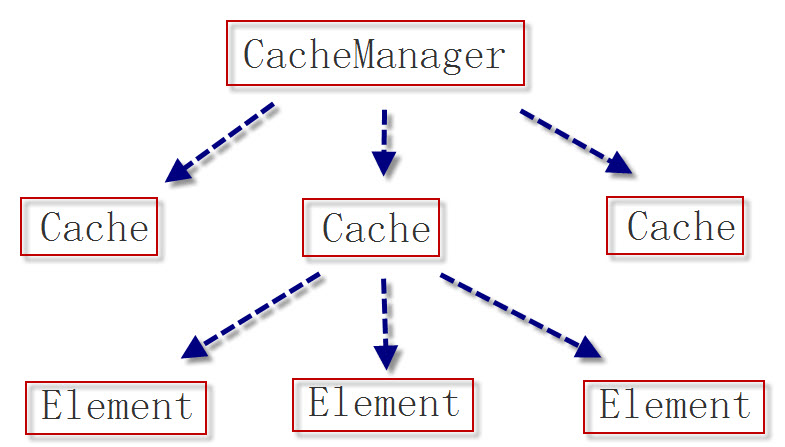
2:基本用法
使用如下:
- 获取manager, 如果ehcache.xml不是在src下,可以由create(“config/ehcache.xml”)来指定路径。
CacheManager manager = CacheManager.create();
2、获取缓存区,根据ehcache.xml中配置的cache节点,指定name来获取cache.
Cache cache = manager.getCache("sampleCache1");
3、创建key-value形式的元素,存入缓存区,或从缓存区取出。
Element element = new Element("key1", "wxwtest");
cache.put(element);
Element find = cache.get("key1");
4、关闭mananger.
manager.shutdown();
另外,Ehcache还提供了监听的机制,在如上的配置文件中:
\<cacheEventListenerFactory
class="com.ehcache.EhcacheListenerTest"
properties="wxwtestkey=200,wxtestkey2=300"/>
其中class是自定义的实现类,继承CacheEventListenerFactory,覆盖createCacheEventListener(Properties props)方法。EhcacheListenerTest代码如下所示:
package com.ehcache;
import java.util.Properties;
import net.sf.ehcache.CacheException;
import net.sf.ehcache.Ehcache;
import net.sf.ehcache.Element;
import net.sf.ehcache.event.CacheEventListener;
import net.sf.ehcache.event.CacheEventListenerFactory;
public class EhcacheListenerTest extends CacheEventListenerFactory
{
\@Override
public CacheEventListener createCacheEventListener(Properties props)
{
System.out.println("==create listener==");
for(Object key : props.keySet())
{
System.out.println(key+"="+props.get(key));
}
return new TestCacheEventListener();
}
class TestCacheEventListener implements CacheEventListener
{
public Object clone()
{
return new TestCacheEventListener();
}
public void dispose()
{
System.out.println("==dispose");
}
public void notifyElementEvicted(Ehcache ehcache, Element element)
{
System.out.println("==notifyElementEvicted");
}
public void notifyElementExpired(Ehcache ehcache, Element element)
{
System.out.println("==notifyElementExpired");
}
public void notifyElementPut(Ehcache ehcache, Element element)
throws CacheException
{
System.out.println("==notifyElementPut");
}
public void notifyElementRemoved(Ehcache ehcache, Element element)
throws CacheException
{
System.out.println("==notifyElementRemoved");
}
public void notifyElementUpdated(Ehcache ehcache, Element element)
throws CacheException
{
System.out.println("==notifyElementUpdated");
}
public void notifyRemoveAll(Ehcache ehcache)
{
System.out.println("==notifyRemoveAll");
}
}
}
通过监听,在对cache做操作时,调用相应的监听类方法。
ehcache的基本用法就是这样。根据以上的基本用法,我们就更容易理解以下ehcache的一些复杂应用。
例二:
import net.sf.ehcache.Cache;
import net.sf.ehcache.CacheManager;
import net.sf.ehcache.Element;
public class EhcacheTest {
public static void main(String[] args) {
// 根据ehcache.xml配置文件创建Cache管理器
CacheManager manager=CacheManager.create("./src/main/resources/ehcache.xml");
Cache c=manager.getCache("a"); // 获取指定Cache
Element e=new Element("java1234","屌"); // 实例化一个元素
c.put(e); // 把一个元素添加到Cache中
Element e2=c.get("java1234"); // 根据Key获取缓存元素
System.out.println(e2);
System.out.println(e2.getObjectValue());
c.flush(); // 刷新缓存
manager.shutdown(); // 关闭缓存管理器
}
}
Ehcache+Mybatis做DAO缓存
在搭建好ehcache和Mybatis的基础上,引入mybatis-ehcache-xxx.jar。
在ehcache.xml中将默认的缓存区配置上,如下:
\<defaultCache
maxEntriesLocalHeap="10000"
eternal="false"
timeToIdleSeconds="60"
timeToLiveSeconds="300"
diskSpoolBufferSizeMB="30"
maxEntriesLocalDisk="10000000"
diskExpiryThreadIntervalSeconds="120"
memoryStoreEvictionPolicy="LRU">
\
\</defaultCache>
修改Mapper.xml,加上\<cache 节点,例如:
\<?xml version="1.0" encoding="UTF-8" ?>
\<!DOCTYPE mapper PUBLIC "-//mybatis.org//DTD Mapper 3.0//EN" "http://mybatis.org/dtd/mybatis-3-mapper.dtd" >
\
\
\<!—也可以是 \
--> \<resultMap id="BaseResultMap"
……
\</resultMap>
\
……
\</select>
\</mapper>
mybatis默认是启用cache的,所以对于某一条不想被cache的sql需要把useCache="false"加上。例如:
| \ | |
|---|---|
……
\</select>
注:貌似单独的Mybatis用不了缓存。测试了没有成功。
Ehcache+Spring做业务层缓存
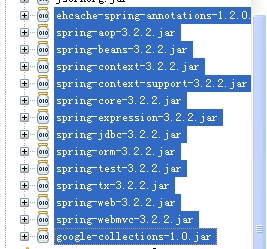
引入相应jar包,spring3.2.xxx所需要的jar, cglib-xxx.jar,ehcache-spring-annotations-xxxx.jar,google-collections-xx.jar
配置spring
\<?xml version="1.0" encoding="UTF-8"?>
\<beans xmlns="http://www.springframework.org/schema/beans"
xmlns:xsi="http://www.w3.org/2001/XMLSchema-instance"
xmlns:ehcache="http://ehcache-spring-annotations.googlecode.com/svn/schema/ehcache-spring"
xsi:schemaLocation="
http://www.springframework.org/schema/beans
http://www.springframework.org/schema/beans/spring-beans-3.0.xsd
http://ehcache-spring-annotations.googlecode.com/svn/schema/ehcache-spring
http://ehcache-spring-annotations.googlecode.com/svn/schema/ehcache-spring/ehcache-spring-1.1.xsd"\>
\
\<bean id="ehCacheManager"
class="org.springframework.cache.ehcache.EhCacheManagerFactoryBean" >
\
\</bean>
\</beans>
配置ehcache.xml
\<cache name="metaColumnCache" eternal="false"
maxElementsInMemory="100"
overflowToDisk="false"
diskPersistent="false"
timeToIdleSeconds="0"
timeToLiveSeconds="300"
memoryStoreEvictionPolicy="LRU" />
使用,在业务方法上加相应注释
\@Cacheable(cacheName="metaColumnCache")
public List getColumnModel(String tableId) {……
}
Ehcache做页面缓存
假如有这样一个需求:给一个网站的首页做一个页面缓存,2分钟更新一次。
以应用结构page-filter-action-service-dao-db 为例,页面缓存做到尽量靠近客户的地方,就是在page和filter之间 ,这样的优点就是第一个用户请求之后,页面被缓存,第二个用户再来请求的时候,走到filter这个请求就结束了,无需再走后面的action- service-dao-db。带来的好处是服务器压力的减低和客户段页面响应速度的加快。
在搭建好ehcache的基础上引入ehcache-web-xxx.jar。
在ehcache.xml中配置一个用于缓存网站首页的缓存区,如下:
\<cache name="indexCache"
maxEntriesLocalHeap="100"
maxEntriesLocalDisk="100"
eternal="false"
diskSpoolBufferSizeMB="2"
timeToIdleSeconds="60"
timeToLiveSeconds="120"
memoryStoreEvictionPolicy="LFU"
transactionalMode="off">
\
\</cache>
- 在web.xml中为添加首页的filter
\
\
\
\
\
\</init-param>
\</filter>
\
\
\
\</filter-mapping>
Ok,页面缓存就是这么简单。通过分析SimplePageCachingFilter的源码,我们可以看到,过滤器通过获取HttpServletRequest的 httpRequest.getMethod()+httpRequest.getRequestURI()+httpRequest.getQueryString();
作为key,从入缓存中查询页面,若没有则读取页面放入缓存中,若有则直接从缓存中返回。
卸载
去掉jar包: ehcache-xxx.jar或ehcache-core-xxx.jar, ehcache-web-xxx.jar,mybatis-ehcache-xxx.jar。
去掉ehcache.xml配置文件。
页面缓存,去掉web.xml中的filter配置。
Mybatis缓存,去掉xxxMapper.xml中的
\
配置。